Web Hosting in the Azure Cloud (Getting Started)

The cloud can seem rather mysterious, but it certainly does not have to be. What most Internet professionals need is some practical and actionable guidance on how they can actually use popular cloud services, including Windows Azure or Amazon Web Services, to host websites.
There are, of course, slight differences in each of the popular cloud platforms, so in order to create as valuable and comprehensive resource for Internet professionals as possible, this article focuses on running a specific app (WordPress) in the cloud on Windows Azure.
The first step, obviously, is to sign up for the service, which in our case took just a few minutes. Windows Azure currently offers three free months to test out the platform (albeit with some limitations), making it a good opportunity to get your cloud feet wet, so to speak.
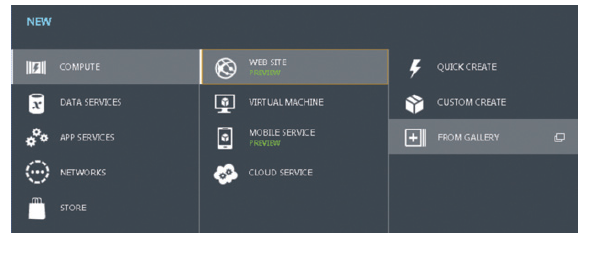
There's a lot an Internet professional can do in the cloud, from running virtual machines to creating backend services for apps running in Azure, but we're interested in running a website in the cloud, right? Azure fortunately provides an opportunity to select from a number of applications including such popular content management systems and blogging platforms like Joomla, Drupal, WordPress, Kentico, DotNetNuke, Lemoon, Orchard and Umbraco, and even some ecommerce systems like nopCommerce and Commerce Kickstart.
Once the type of application you want to run has been selected, it's time to configure that applicatio on Azure. That's as easy as selecting a
URL (changing the DNS configuration comes later) and selecting a region. It's also possible to run a database in the Azure cloud so should you have the desire and knowledge to create and use your own Azure-hosted database, at this point you'll have an option to either select your own or go with the default MySQL database.
After the initial database setup is complete, Azure will automatically provision the account and install WordPress (or whatever software you've selected). The whole process takes less than a minute. Visiting the URL previously defined from the Azure control panel will direct to an installation completion process for WordPress where administrative usernames/passwords will need to be created. Once that step is finished, the WordPress site is live for the whole Web world to see.
Since you'll likely want to use your own domain name for your WordPress blog (or any of the deployed software applications selected) a few additional steps are necessary - namely, modifying DNS records including CNAME or ANAME at your domain registrar. Azure provides detailed guidance on the configuration process, which outlines the specific requirements and steps. Essentially, setting a custom domain name on a website site is only available for the shared and reserved modes (not free) for websites running in Windows Azure.
Much like a traditional hosting account, Azure provides a control panel for your cloud account from which you can monitor CPU time, HTTP Server errors and requests in different time periods for the running applications. You can also modify some general settings, such as the capacity and number of instances running, making it rather easy to scale a website for additional throughput and availability.
Getting a WordPress website up and running in the Azure cloud was exceedingly simple. There, is of course, much more that will go into the management of that website on the Azure cloud, but thanks to a rather intuitive interface (see image) and a very well-documented support system, getting started in the cloud is quite simple and should be on the todo list of things for Internet professionals to explore.
Run Websites in the Amazon Cloud
Windows Azure certainly isn't the only cloud offering for Internet professionals; Amazon's EC2 also makes the process rather simple. Discover the necessary steps to get your WordPress or other software systems running in the Amazon cloud.